
Creating a Rota
The schedule is created against each of the employees that are due to work every day. Split shifts can be accommodated along with copying the schedule from previous weeks to allow quick and easy setup.
To create a rota:
-
Select the Do Schedule button, choose the required week to create the schedule for, and press the OK button.
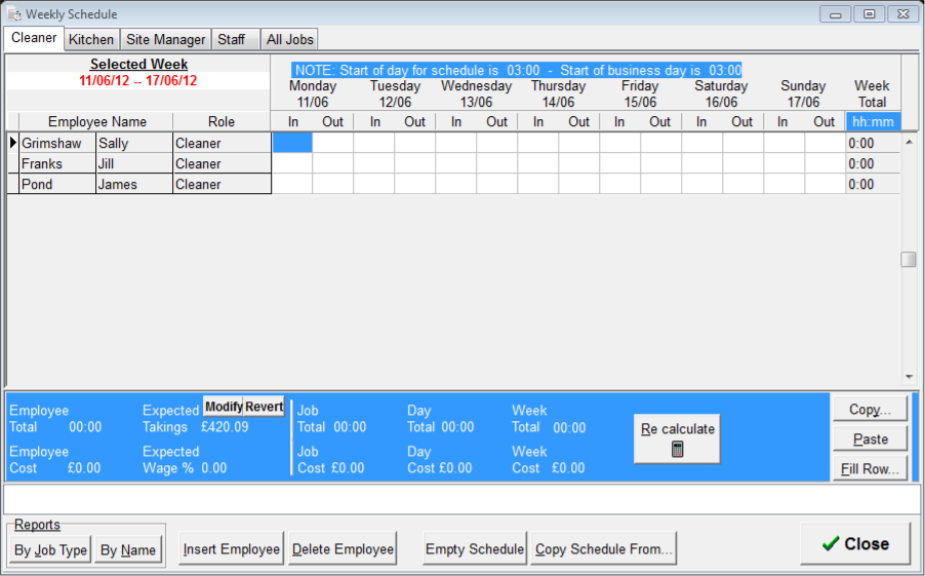
- The Weekly Schedule screen will be displayed.
Depending on your configuration, the schedule can display all employees for each of their job roles, or it can be blank with no pre-inserted employees.

-
Select the required Job Role tab from the top of the window and press the Insert Employee button.
-
From the list presented, select the required employee. Alternatively, if the schedule is automatically populated, type in the required In and Out times needed.
-
The schedule can be copied from a previous week, saving you time. To do this, press the Copy Schedule button and select the week to copy from.
-
For employees working a split shift, enter the first set of required hours for the employee, and then press the Insert Employee button and add that employee in again. This will provide a secondary line to add in the second set of working times.

-
To remove an employee from the schedule press the Delete Employee button and confirm by pressing the OK button.
-
At the bottom of the schedule (in the blue section) you will see a current calculation across a number of values

- To complete the schedule press the Close button.
By default the current week is automatically selected.
Times follow the 24 Hour clock style, e.g. 13:00, 14:00 etc.
(There is no requirement to enter the dividing colon : as the system will enter it automatically).

The previous week’s times will automatically be populated into the schedule, so ensure that these are accurate for the new week before proceeding.

In addition, there are other further options available to you when creating the schedule:
Fill Row - by clicking this option you can enter an In and Out time once, followed by the OK button; the entered times will be automatically populated for every remaining day of the week.
Copy – by clicking this option you can highlight a current working time and then choose either to select the Current Day Only, or alternatively the Whole Week.
Paste – after copying the relevant information, you can paste the times again where needed.

Employee Total - for the current employee line selected, this will display the total hours they are scheduled to work.
Employee Cost - for the current employee line selected, this will display the total wage cost of the employee.
Expected Takings – a calculated figure will be displayed as to what the system is predicting will be taken in sales.
By clicking the Modify button a new manual figure can be entered. To re-calculate new figures press the Re-Calculate button.
Expected Wage % - a calculated wage % figure based on total employee costs vs. expected takings.
Job Total – total number of hours scheduled for the current job.
Job Cost – total cost for the scheduled hours for the current job.
Day Total – total hours for the current day selected on the current job.
Day Cost - total cost for the scheduled hours for on the current for the current job.
Week Total – total scheduled hours for all jobs for the entire week.
Week Cost – total cost for the scheduled hours for all jobs on the entire week.
The schedule can be printed by Job Type or by Name. Both buttons will open up the report in Dimensions Reporter.